Wednesday, February 29, 2012

Preparing for St. Paddy!

Today, I tried to teach Lil Boy about the concept of St. Patrick's Day.

Me: St. Patrick's Day is a holiday that originated in Ireland.

Lil Boy: (Blank Stare)

Me: Ireland is a country far away. 

Lil Boy: Oh! Are we going there on a plane? 

Me: Um, no....

Lil Boy: Yay! Yay, yay, yay, yay, yay!


Me: Sigh.

So St. Patrick's Day is fast approaching. And it really shouldn't mean anything to me because I'm a have a three month old and I won't be going out to drink green beer and tell people to kiss me cause I'm Irish. This holiday isn't celebrated where I'm from, and for most people I know it's really just a fun reason to party and get joyfully drunk. However, it does give me a good excuse to make printables and do crafts and all kinds of silliness. It's also great for a cultural lesson, and there are so many fun St. Paddy's ideas for activities to do with your kids. After I explained to Lil Boy that we were not in fact going to Ireland, we talked about St. Patrick's Day and leprechauns and rainbows and all that great stuff. So needless to say, there will be lots of crafts and activities in the next couple of weeks.

I did some browsing for inspiration and found 16 ideas for free printables, crafts and recipes that you might like to try yourself.

St. Patrick's Day Printables:


1. "Lucky to Have You Printables" by The Crafting Chicks
2. St. Patrick's Day Gift Tags by Hello, Good Gravy!
3. Subway Art by Eighteen 25
4. Pot of Gold Favor Tags by It Is What It Is


St. Patrick's Day Recipes:


1. Rainbow Pancakes by Amanda's Diner
2. Chocolate Guinness Pudding by Sprinkle Bakes
3. Shamrock Green Peppers by Martha Stewart
4. Rainbow Cupcakes by Family Fun


St. Patrick's Day Crafts:


1. Lucky Leprechaun Beard by Blissfully Domestic
2. Paper Plate Leprechaun by All Kids Network
3. Tissue Paper Rainbows by That Artist Woman
4. Rainbow Favors by 4 Crazy Kings


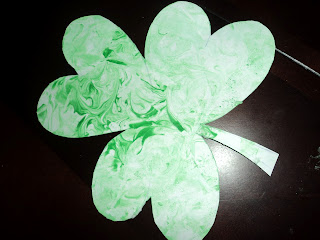
To get things rolling over here, we did a fun craft that I like to call shamrock marble painting, using paint and shaving cream. Lil Boy got a huge kick out of doing this, I think he loved the feeling of the shaving cream against his hands.

To make your own shamrock marble creations, you will need:

Supplies:
Green paint
Shaving cream
Paper plate
White construction paper
Paintbrush
Popsicle stick


Fill the paper plate with shaving cream. Add drops of green paint.


Use a paintbrush to swirl the paint around.


Cut the shape of a shamrock out of the construction paper.
Press the shamrock down against the paint/shaving cream mixture.


Pause so your child can revel in the messiness.


Scrape the excess shaving cream off the cut-out.


And voila!


Fun, messy, and the results are so pretty.

Happy crafting!


Sunday, February 26, 2012

A Buzz Lightyear Birthday Party

Last summer, for my son's fifth birthday, I decided to throw him a Buzz Lightyear party. Alex has been a fan ever since he watched the first Toy Story movie at three years old. He loved him so much he used to freak out at that scene where Buzz fell out of Andy's bedroom window. He would run over to the TV in a panic and yell "Buzz! Buzz! Nooooooo!"

So it was no surprise that he picked this theme. He had a Buzz Lightyear toy that he played with all the time. He wore a Buzz costume for Halloween. His favourite catchphrase was "To infinity...and beyond!" He was over the moon about this party.

"Woody who?"


But if you know anything about five year olds, you know they can be fickle. After I spent weeks searching the web for party ideas, for crafts, for Buzz Lightyear decorations and spent hours designing the invitation, my son cheerfully announced one day: "I don't want a Buzz Lightyear party. I want Transformers."

Okay, so this was my fault. I made the mistake of picking Transformers for movie night one Friday and he was besotted. How could Buzz Lightyear hold a candle to gigantic bad-ass robots that can transform into trucks?

Unlike Buzz, these things can actually fly.

So after all my planning, he didn't want to hear anything about a Buzz Lightyear party. Great.

You know those parents who really listen to their kids and give them the freedom to choose whatever they want? I hope I grow up to be one of those, I really do. However, there was just no way I was going to throw all my plans out the window and come up with a Transformers party in three weeks. I'm not saying I forced him to choose my Buzz Lightyear party. I would never do that. I'm not saying I brainwashed him either. What kind of momma do you think I am? All I'm saying is, the next movie night turned out to be a Toy Story marathon. And that's all she wrote.

We didn't get to do a lot of the activities we had planned because of the freak thunderstorm that showed up the morning of the party. Naturally it was bright and sunny the day after. Happens. Every. Single.Year.

Anyway, here is my...er I mean Alex's Buzz Lightyear party. It was really based on the DVD movie: Buzz Lightyear of Star Command. Feel free to take inspiration from any of my ideas!

Invitation: The party theme was based on the idea of Space Ranger trainees. I thought it would be cute to have the kids take part in a training program and get rewards at the end of the party.


I got this fabulous idea from a friend. Decorate the glass doors or windows in honour of the birthday boy/girl using Crayola Window Crayons. However be warned: cleaning it off is pretty tedious, even with window cleaner.it took me forever to get rid of the streaks. But Alex loved it. I can't take credit for the artwork - that was my sister's doing.


Party props: I found this post by Filth Wizardry on how to build a cardboard rocket ship, which was the perfect idea for our space ranger theme. We used a bunch of large cardboard boxes from the grocery store. And when I say 'we', I mean Alex's wonderful Uncle who did all the work while I barked instructions. He built the spaceship using cardboard, duct tape and a wood base, then covered it with foil. He even taped glow-sticks inside to provide extra light, however the kids ripped those off in no time.Is it starting to sound like I didn't do much of the work myself? I delegate well, hehe.


Shout-out to my Jamaican peeps!
Decor: I created different posters to put up around the house. My favourite was the 'Great Escape' poster for Toy Story 3 - you can see it hanging above the Canadian flag on the rocket ship. I used Photoshop to superimpose a picture of Alex in his Buzz costume onto the photo so it looked like he was running along with them. It wasn't perfect but he loved it! "But how did I get in that movie, Mommy?"


It wasn't too difficult to change 'Andy' to 'Alex'.


I had a hard time deciding what kind of cake to do because Alex doesn't really like cake at all. I finally decided on Buzz and Zurg facing off on a planet-shaped cake, with Little Green Men cupcakes surrounding them. Cupcakes he can handle - and most little kids like them. I just picked up the figurines in a toy store. And no I did not bake it myself!


Each child got to take home one of these cookies.
Like I said, the random thunderstorm destroyed most of our plans so we had to get creative.

A Wii dance game is always good for party entertainment!


The main event was supposed to be a showdown with the evil Emperor Zurg. I planned to coax the afore-mentioned Uncle into a Zurg costume, and basically let the kids eat him alive. Zurg hasn't been seen on the big screen since 1999 so naturally there were no costumes available anywhere. We had to get creative. I found a tutorial on how to build Zurg's head here. The overworked Uncle got the job to build the frame for the head using wire hangers. After he added to tape to form a base, I layered it with papermache and painted it with Alex's  help.


So after all our slightly sloppy hard work, this was the finished product:

We spent over two weeks building it. And the kids destroyed it in about...three minutes.


They literally ripped him apart. Poor guy. Anyway, the kids had fun, and that's what's important, right? Walk it off, Uncle. Walk it off.

On to our Marvelous Monday freebie! If you decide to throw a Buzz Lightyear party for your little one, you might find this free printable useful! I created wrist lasers for the kids by printing out a template I made in Photoshop. I covered empty matchboxes with green craft foam and glued the template on top, and attached wide pieces of elastic with a Velcro enclosure. Finally I lined the matchboxes with paper, and filled them with jellybeans, so the kids could "power up" whenever they got tired.


I also created space ranger badges which each child received at the end of the party. These were a big hit!


We had great fun planning this party. For Alex's next birthday, he wants a Pirates of the Caribbean theme. Naturally, I've already started planning, so if he decides on something else, there are four movies that will help me to convince him otherwise.

You can download the template for the wrist laser and the ranger badges, as well as the customizable posters here.

Happy Monday!

Thursday, February 23, 2012

Get Organized for Spring!

I really have no business telling anyone to get organized because I live in chaos. I really do. Whenever I drop by someone's house unannounced I am always amazed to find it spotless. Especially people with kids. How do they do it? Do they have a secret cleaning lady-slash-ninja? Do they keep their kids handcuffed to the stairwell? Do they sleep??

I have to admit, I've never been a fan of cleaning, and I've never really been organized. As a teenager, I drove my mother up the wall by avoiding chores whenever possible. As a college student I got by doing the bare minimum. Then I got married, and was horrified to realize that I was expected to do some measure of cooking and cleaning.

You want me to do what?
To be fair, after I had kids, my nesting instincts kicked in a little bit and now not only do I notice the clutter around me, I actually feel bothered enough to clean it. So I am proud to say I clean on a regular basis. (Just in case you were reading this post and thinking my family lives in filth.) However, I still can't get my house to be spotless all the time, the way some people do. With two children it is practically impossible. Cleaning when you have children is like shoveling snow while it's still snowing. It just doesn't work. A five year old boy can destroy an entire room in the length of time it takes you to get a drink of water. This is the reality in my house. So if you're going to stop by, please call first!

This is the order in which I like to do housework: 1) Laundry 2) Vacuuming 3) Contemplate Suicide 4) Dishes.
 
So I regularly need motivation. I searched the web and found five great organizing tips for spring. Even if it's technically not spring where you are, it's always a good idea to get rid of the clutter in your home and feel like Martha Stewart for a day. If I can do it, so can you!


1. Earring Picture Frame


 This is such a fabulous idea, inspired by Bless Our Nest. I particularly love this because I'm a fan of big dangly earrings that never quite fit into a regular jewelry box. Something like this would be perfect for them. All you need is a pretty little picture frame and some lace.


2. Medicine Storage


My medicine cabinet desperately needs this. I routinely go through and clear out old and expired medications, but between creams, ointments, pain pills, cold meds, and vitamins, it just becomes one big jumble. Ask Anna came up with this great way to keep everything organized and easy to find. I also love the idea of labeling each storage box (hmm, free printables, anyone?)


3.  Cord Labels


Alright, how genius is this? I knew those little bread plastic labels had to be good for something other than taking up space on my kitchen counter! I often use my computer to watch movies on our TV which means lugging it back and forth across the room several times a week. And I always have trouble figuring out which cord goes where. Even if you don't move your PC around much, that one time when you need to unplug something, this could save you a lot of frustration and cursing. Thanks goes to Apartment Therapy for this one.


4. Cleaning Supply Rod


It feels like I'm always fighting a losing battle with the cleaning supplies under the sink. It's an area that is out of sight so it gets ignored most of the time. And when I'm done cleaning the bathroom/scrubbing the floors/wiping the windows, I don't feel like putting things back neatly. I yank off my plastic gloves, I throw everything back under the sink and I go lie down. However, one small tension rod installed in the cabinet, and I could be inspired to put everything back in its place. Find it on Style Lush Blog.


5. Pebble Boot Tray


This is great for the rainy season. Mini Manor offers this pretty yet practical way to keep your front entrance puddle-free. All you need is a metal tray and some decorative stones.


I will be trying all of these in my own house, and I'll post pictures for you guys to see. If you try any of these, leave me a comment and let me know how it worked out for you. Leave me a comment if it didn't work out for you. Whichever one, just comment! I love feedback. People keep texting me and emailing me about my posts, but no one leaves a comment. Come on people! I like the attention, tee hee!

By the way, in my efforts to become more organized, I am trying the 21 day challenge, created by A Bowl Full of Lemons. I'll let you all know how it goes. Happy organizing!

Monday, February 20, 2012

Marvelous Mondays!

I know, I know, Monday isn't even remotely marvelous. It's the depressing, mind-numbing start to the week. All the fun you had over the weekend means nothing when it's time to get up early and face five days of hustling back and forth. The alarm sounds almost smug when it goes off. If you work at home and you have kids, it's a guarantee that they'll be whiny and uncooperative. If you work in an office, then as soon as you trudge in on a Monday morning, your coworkers are going to want to actually talk to you. Loudly and cheerfully. They'll say things like "Hey there!" and "Good morning!" (whoever coined that phrase was an idiot). You won't even have time to reach for a cup of coffee before your boss starts asking about that thing you were supposed to do last week but happily blew off because it was 3:30 on a Friday afternoon and Monday seemed light years away.

"Happy Monday! Sincerely, Your Problems."

The only way to survive a dreadful case of the Mondays is to find something that makes you happy. Do something nice for yourself. Buy those shoes you've been eying for two weeks. Treat yourself to dessert after lunch. Laugh at a coworker behind their back. Whatever makes you feel good. And one thing that makes me feel good is free printables! So every week, on Marvelous Mondays, I will be serving one up to you.

This week's free printable comes courtesy of the games night we had this weekend. The theme was Minute To Win It. Have you seen this show? It's hilarious. Contestants have to complete various tasks in 60 seconds or less. I came across the idea for a couples Minute To Win It night over at Dating Divas.  You can find a huge list of the games on the NBC website. It gives you an explanation of each game and how to play. And the game supplies are easy to find items, like cups, eggs, cans, pizza boxes. I encourage you to have some friends over and throw a Minute To Win It party yourself. So much fun!

Here's the invitation that I emailed to everyone:


I created cupcake toppers, water bottle labels, and a banner. Gotta have ambiance!


Here are our three teams:

Team Levelz!


Team Limitless!

Team Big Dealz!
You'll want to invite people that are competitive and don't mind making fools of themselves, hehe. And these three teams were extremely competitive. All week long everyone was trying to get me to tell them what games they would be playing so they could practice!

The first challenge was the Breakfast Scramble: Put together pieces of a cereal box like a puzzle.


 Next up was Defying Gravity - keeping balloons off  the floor by tapping them.


The next game is called A Bit Dicey - balancing six dice on the end of a popsicle stick held in your mouth:


Not as easy as it looks!

Next was Egg Roll - using an unopened pizza box to fan eggs across the room.


At some point Lil Baby decided to join us.
Who needs sleep when there's games and pretty girls downstairs?

I only picked a few games but next time I'll choose more - everyone really got into it! The bonus round was my favourite part of the night. I found a hilarious M&M math challenge on Pinterest, created by Stacy.

I had to tweak mine a bit because I couldn't find Pixy Stix anywhere! So I replaced it with a little container of sugar. Contestants had to bite the ends off the red vine, dump the sugar into the circle, use the red vine to blow the sugar out of the circle, open the Hershey's kiss one-handed, arrange the m&ms into the circles, and complete the math equation.

No one was able to do this in under a minute!
By the way, I am terrible at math and had no idea what the correct answer for the equation should be. Don't judge me! And each team got three different answers, so we were kind of at a loss, haha. If you're a math genius, feel free to leave a comment and shed some light for us. Head over to Stacy's blog if you want to download a pdf of this challenge.


So that was our Minute To Win It night. We're definitely doing it again, and I think you should try it too. I've created a set of printables for you to plan your own night. You can either print the invitations and write in the date and location, or use your photo editing software to add the details.

Download the full set here.


Happy Monday!


Linking up over at Tip Junkie! Tip Junkie handmade projects